In most gardens the use of landscape edging plays an important role in two key aspects – design and function.
Most gardens are made up of a series of different shapes and forms often with each area being set aside for a different purpose and specific role.
From flower gardens to vine or creeper covered sitting areas, the use of creative garden edging enhances and defines each area of the garden ultimately helping to form the overall design and feel.
Landscape Edging Uses
So, what is Edging good for – what does edging achieve ?
In practical terms landscape edging prevents grass from spreading into neighbouring garden areas but it also prevents garden soil or mulch from spilling out onto the lawn.
In addition to that Landscape edging also creates definition & provides a barrier to pathways made of loose materials like gravel or mulch – helping to keep those loose materials in place.
Another benefit to using landscape edging is that it helps to create fabulous features by highlighting different growth & interest areas and keeps people out of purpose areas like planting beds for example, where you don’t want them to go.
Raised or taller edging such as low level hedges or fencing provide a natural way to direct garden walkers & workers while another beneficial use relates to lawn maintenance & time saving.
Garden edging reduces maintenance by creating a natural mowing strip – if the edging is set slightly higher than normal lawn growth – which more or less eliminates the need to use trimming equipment like Strimmers.
This technique also prevents loss of plant life through accidental mowing over beds at the lawn edge.
Landscape Edging Materials
Often, the best landscape edging products are determined by the size and layout of your garden space but before rushing off to buy or reclaim edging products it’s best to draft out an edging design plan to allow the right decisions to be made about cost & design.
While a large range of materials suitable for edging do exist, ideally the choice of material should be based around the critical factors of style, function & cost.
So what landscaping material fits your budget ?
If you’re using mulch in the bedding, edging will need to be raised above the mulch and drop below it around 4 inches.
By thinking outside the box a little, even items that might seem to be the most unexciting materials can often become interesting edging options and create spectacular results.
Here’s a few of the more common uses of Edging Materials.
- Lawn & Garden Divider
(a divider between the lawn and garden bed)
- Mowing Strip
(Use a flat, wide material to create a firm base)
- Mulch Capture
(use a material that sits minimum 2 inches above ground)
- Cosmetic Edging
(Purely for looks and appearance)
Natural Materials
Natural stone – rugged, durable, easy to use & it looks great. Can be expensive and can be heavy to work with though, depending on size & density.
Cobblestones – uniformity makes them easier to fit neatly together.
Wood – is another natural material, popular & attractive. Untreated wood rots quickly which is why most landscape timbers are treated with weather resistant wood preservatives. Ideal for straight line borders & edges.
Manufactured Materials
The four most common materials
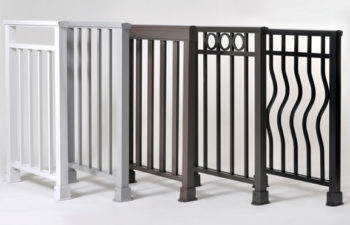
Metal
(a simplistic look, neither extravagant or eye-catching, can be painted)
Plastic
(cheap looking but very cost effective for a stretched budget)
Concrete
(popular but can be heavy to work with)
Brick
(traditional & colorful look, light to work with)
Landscape Edging Styles
When it comes to product selection for garden edging, consider all other materials present in the garden and think about how those products work together and whether those products might cause consistency or distraction.
While brick, stone, and paving can unify patio or path edging, seldom thought of materials, like slate, tiles or glass, can be used in tandem with standard edging materials to blend or match accents from other garden areas.
Classic Look
Look for old, worn or reclaimed bricks to create a timeless country style look perfect for country or cottage settings. Contemporary or more formal landscape areas are better suited for new bricks.
Motion
Use shape to create interest and a sense of movement to walkways through the landscape areas. Ideal for bricks and pavers.
Gravel
Gravel is a fantastic material for garden edging & paths, especially for properties located in warm weather climates. Gives your garden a warm, natural look and drains well.
Architectural Consistency
Complement the style of your property through the color of edging products to ensure they blend well and conform to your property theme.
Environment Concerns
Creating water tracks when laying garden edging allows effective run-off and irrigation to other garden areas – also prevents standing water & flood zones.
Look of Illusion
Widen the edging along paths and walkways, especially around corners, to make any area look and feel bigger than it is. Similarly a straight, long path can be made to look even longer by narrowing at a far end.
Mixture of Materials
There’s no rules to Landscaping, no rule that insists on the use of a single material. Easily create a sense of age by using old, broken bricks and reclaimed products like flagstones for example. Signal a transition between areas by switching to pavers or bricks or additional edging types..
Landscape Edging Types
- Brick : easy to use and long-lasting, brick and is ideal for creating a consistent uniform look. Comes in a variety colors of styles.
- Plastic : affordable and easy to install and maintain due to its flexibility. Recycled Plastic is especially popular.
- Concrete : purchase preformed sections of concrete edging that are ready to be set in place, or make a simple form and create a custom edge.
- Wood : affordable and popular as an edging option straight line borders. Wood adds a casual, organic look easily lasting around 10 years. Pressure treated pine is exceptionally good, but Cypress, Cedar and Redwood are fantastic alternatives too. Keep in mind that any chemicals used to treat and weatherproof this product are usually safe for plants and soil but not so good for the health of domestic pet life.
- Stone : one of the more versatile edging materials, stone can be carefully set in mortar for a refined look or placed more casually for a relaxed appearance.
- Steel : weathered steel has grown in popularity and features regularly as landscape edging in gardens now. Because it’s naturally more pliable than brick or stone it is much easier to work with in curved areas.
- Wattle: this edging uses a technique that involves weaving saplings of pliable wood, such as willow or dogwood, into a low fence. Wattle works well for holding back mulch.
Landscape Edging Ideas
An abundance of attractive garden edging ideas to keep grass and plant life from invading your garden areas.
The key is to find practical solutions that are both good looking and affordable edging ideas that ultimately compliment your landscaping
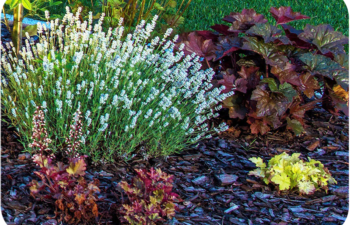
Edging for Flower Bed Borders
Edging doesn’t always have to be between a bed and the lawn, edging a flower bed next to a path helps to blend the lines in the garden.
Using plants to do this is very effective and, if you pre-plan and propagate your own plants, can be cheap too!
Upcycling has become extremely popular these couple of years and garden edging has proved to be a perfect area for that resourcefulness with plates and bottles becoming a wide used item for garden edging design.
From the simplicity of a neatly cut edge to the stability of a traditional sleeper or the creative appearance of an up-cycled design, there’s any amount of ideas to suit any garden and most budgets.
- Sleepers – make sturdy & earthy looking edging, especially for raised beds
- Metal – Can be made from recycled goods or bought new
- Wood – a popular natural material that easily blends with the garden
- Rocks & Pebbles – creates a natural and textured look
- Stone – Long lasting & hard wearing
Lawn Edging
A well defined edging will easily show off and highlight a well maintained and manicured lawn although one possible drawback of heavily manicured lawns is the need for frequent attention to mowing, weeding and re-seeding – meaning this type of lawn can sometimes be labor intensive.
A few options to consider ;
Soft Lawn Edging is where a border meets the grass easily maintaining the lawn shape via regular trimming.
Brick Edging Brick edging laid similar to a path between a border and the lawn creates a traditional feel and blends well with planting.
Paved Edging that meets the border comfortably achieves an informal yet tidy look especially if plants such as lavender are allowed to reach out from flower beds softening the hard paving look in the process.
Wood Edging an easy to install option that retains soil and effortlessly blends surrounding plant-life – to prevent rotting simply apply a quality wood preservation
Sharp Edging combined with minimal planting produces and a clean and sophisticated look – a style influenced by and often found in the gardens of asian countries.
Decking Timber Edging used as a ground level edging is a perfect option for garden designs where a lack of real available space means improvising.
Ground Level Edging
if you’re looking for a unique but neat and tidy lawn edging less than 20cm in height, popular Australian garden company FormBoss manufacture and supply an edging system that is flexible yet very strong after installation. To find out more about flush garden edging visit a FormBoss outlet found in major cities around Australia.
Curved Garden Edging
Curved edging is easy on the eye providing a relaxed and graceful flow to your garden. This type of edging does take a bit of planning and more work than straight edging but does produce outstanding results.
Using a flexible garden hose to mark out the desired pattern is a simple technique before using spray to confirm lines. It is advisable to keep your trench line between 6-8 from the garden bed.
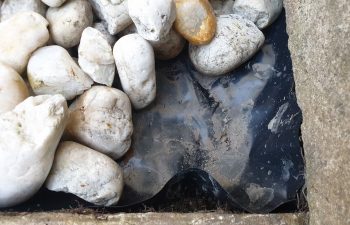
Edging for Drainage
If your garden areas have drainage issues or you need to establish a runoff for water, it’s easy enough to make a feature of it by creating colorful drainage edging.
Drainage trenches can be filled with decorative stones and by adding colored glass stones for a bit of vibrancy.
Edging for Herb Gardens
A great way to introduce fragrance and color to bed and pathways borders is to line them with Herbs, giving a lovely sense of flow and movement to a garden.
Raised Limestone Edging
Introduce an ultra-modern feel by lining a raised garden bed with limestone capped sandstone which creates a meticulously clean & uniform edging look – ideal for garden enthusiasts who want to create a perfect landscape.
Patio Brick Edging
Patio brick edging offers a timeless and classic look to beds and borders. Also serves as a good mowing guide if set flush to the ground. Used to transform edging into a sophisticated looking feature and can be used in place of having planters around the perimeter of your patio – simply dig beds, enclosing them with a brick border.
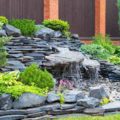
Pebble Garden Edging
A pebble mosaic using polished stones are a popular choice for garden edging and give borders a fantastic looking finish. Involves a bit more effort than laying traditional stone borders this edging idea is best used along lawns, creating a blended transition into paving or cement pathways.
Pot Plant Edging
Lift the drab look of winter by painting a pile of disused planters at the end of each summer season and lay them along the boundary of flower beds for a blast of color.
Landscape Edging Costs
Costs are usually dependent on the type of material and quantity needed.
If cost is an important factor expensive types of edging may have to be used sparingly – perhaps reduce the overall cost by using a premium product only in areas that might be seen up close and often, like focal points or feature areas.
More affordable materials like re-purposed stones are often free and extremely suitable to be used elsewhere in the garden to pretty an area or where volume is required.
Tiles or brick may be very expensive so be sure to include the cost of purchase and installation in your edging plans.
Installation costs of different materials varies too. Some materials require professional installation or special tools to get the desired look and quality finish while other products sometimes lend themselves to an easy do-it-yourself project which drastically reduces the cost of the exercise.
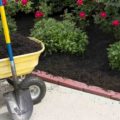
Installing Landscape Edging
Regardless of the type of edging you plan to install most products will require digging a shallow trench for your edging to sit in.
Most edging products are designed to be installed a few inches below the surface to hold the edging securely in place – an important point when remembering that most edging is used as a barrier to prevent grass growth in plant beds and also to retain water – so keep in mind there will always be a set of general tools & equipment that come in handy during the preparation phase of the install job itself.
Ensure the installation goes as smoothly as possible by having close to hand the following items;
- Wheelbarrow
- Square faced Shovel or Trench digging Tools
- Tape Measure
- Spray Paint / Ground marker
- Edging Material
- String Line
- Stakes or Pegs
- Gloves
How to Install Garden Edging
We’ve compiled an overview of some of different types of garden edging with some brief notes about installing each product type, read below to learn more.
- How to Install Timber Edging
- How to Install Natural Stone Edging
- How to Install Concrete Edging Pavers
- How to Install Brick Edging
- How to Install Plastic Edging
- How to Install Metal Edging
1. How Install Timber Edging
Ideally, timber edging should be partially buried at the base so start by using a square nosed shovel to dig a trench a few inches deep running the length and shape of the design you have decided on.
After measuring the area cut the timber edging material to the correct length required and place the timber using a mallet to tap and check the level as you move you along.
Use stakes or hardy pegs to keep the timber in place remembering to leave the stakes secured a bit lower than the top of the timber edging.
To hold the timber in place, back-fill the space behind by using the same soil you dug out for the initial trench – compacting it down to create a more solid and strong support method.
2. How to Install Natural Stone Edging
Before opting for natural stone edging keep in mind that it is often heavy and awkward to lift or work with.
Natural stone comes in two forms – naturally sourced reclaimed stones to use as edging or hewn stone bought from a commercial outlet.
You can easily make free-form edging using natural stones if the stones are lightweight and easy to handle.
Hewn stone, usually large and heavy, is recommended to be installed by stonemasons.
3. How to Install Concrete Edging Pavers
Run a string line where you want to lay the concrete edging pavers making sure to to use a reinforcing stake or peg to attach a tight string line to.
Dig a trench wide enough to fit your chosen edging but deep enough for a foundation layer of material and concrete. Most edging pavers will settle 10mm into the base layer, so be sure the base is deep and compacted down.
Lay the edging pavers, making sure they’re placed straight along the string line. To cut a concrete paver to size use an angle grinder with a diamond or concrete cutting blade. Before the concrete edging sets in place do one final check to ensure the pavers are in line and consistently level.
After the paving sets and cures, it’s ready for grouting which is simply done by mixing the grout and using a pointing trowel to work it into the gaps between the pavers and smoothing it out as you work along the line.
Clean excess grout off pavers using a wet sponge.
Keep in mind that if the installation is carried out in hot weather then it’s best to lay only a few pavers at a time to prevent the base products from setting or becoming unworkable.
4. How to Install Brick Edging
Brick Edging gives a garden an informal and rustic feel, with the bricks blending in with your garden as they age. Add mortar between the bricks for a more formal appearance.
As with most other types of edging, you will need to sit the bricks about half their height or depth beneath the soil.
Consider hiring a proven handyman or bricklayer to ensure better results if you’re not sure of your own ability to work with bricks or masonry products.
5. How to Install Plastic Edging
This long-lasting divider is both practical & inexpensive and very effective when it comes to separating beds from lawn. Offers a nice finished look to any garden area and perfect for DIY enthusiasts or avid gardeners to install.
First mark the desired area with spray or a string line and measure it to get an estimate of how much edging you need keeping in mind that good quality edging is at least 5 inches wide – strong enough to withstand weather elements and maintain shape – whereas flimsy lightweight plastic is not long-lasting.
Dig a trench along the marked line as deep as 4 to 6 inches to prevent grass from creeping under your edging. Use a wheelbarrow to collect the trench soil and use that to reinforce the edging later.
Push the plastic edging down into the trench until approximately ¼ to ½ inch is visible above the ground – any more than that is not advisable because it could cause you or someone else to trip.
For any curves that might exist around your landscaping beds drive landscaping stakes through the plastic and into the lawn horizontally to hold the edging firmly in place before back-filling the space between the edging and the trench with the collected soil dug out from the trench.
This will help the soil to settle in tight and hold the edging firmly in place.
6. How to Install Metal Edging
Lay a garden hose along the line where the edging will go, marking where the edging will start and stop on the hose. Simply measure between the marks to calculate how much edging to use.
Using a sharp spade make a narrow trench for the edging to sit in and once that is complete place the edging into the trench putting stakes in far enough to hold the edging upright. Form any curves by hand and overlap the ends using stakes to connect the pieces.
Drive all the stakes into the ground with a heavy mallet or hammer until the stakes sit flush with the top of the edging, which should stick up about 1 1/2 inches above ground level.
Cover any sharp top edges by using a vinyl capping to protect against tripping
Where to Source Edging
Edging is commonly found at most established Hardware & SuperStores such as Bunnings, Lowes, Landscape Specialists, Online auction platforms like Amazon & Ebay plus Stone Quarries & Architectural salvage depots.
Landscape Edging Colors
The color of the edging has a big impact on the overall look and feel of your garden space by either complementing or creating contrast with the surrounding foliage and flower beds.
Handy tips to establish continuity in your garden include linking the edging to the garden by using plants of a similar color or tone.
Use uniform materials like steel, wood or brick or even pre made concrete based products for more formal style beds and edging.
Final thoughts
With literally no restrictions on what can be achieved, landscape edging has the ability to transform gardens & groundwork by bringing colour, shape, and definition to jaded & untidy areas.
To tell your story or to share how garden edging has enhanced the look and feel of your home and garden leave a comment below or share on our facebook page.